

Every road out of a clip
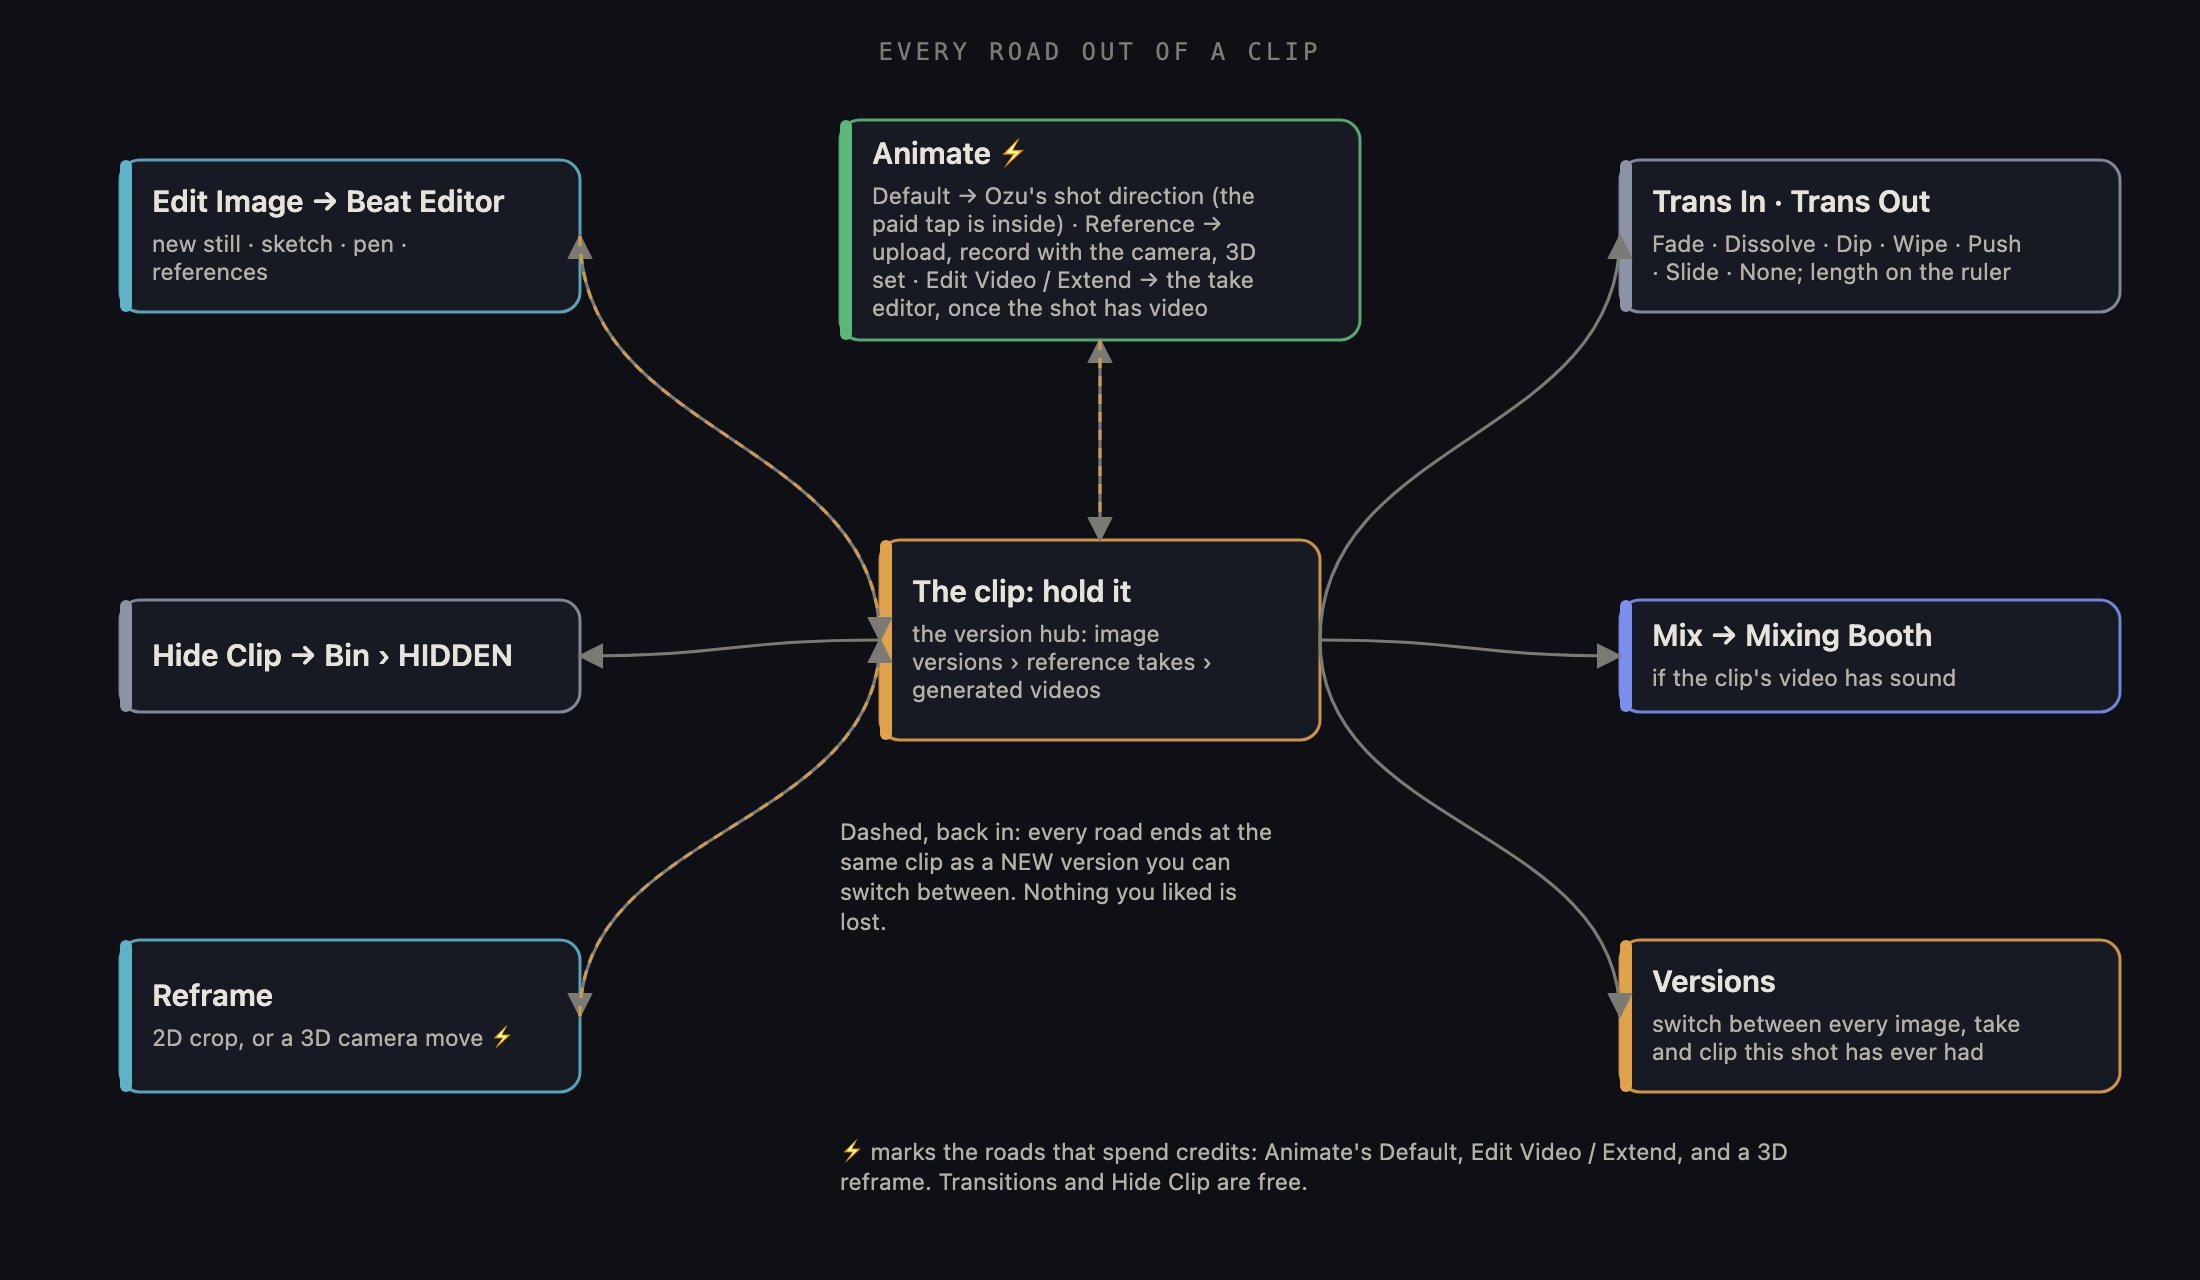
Hold a clip and its radial menu opens. Follow any spoke outward to the tool it opens; every road ends back at the same clip as a new version you can switch between.
1 · The viewer and the transport bar
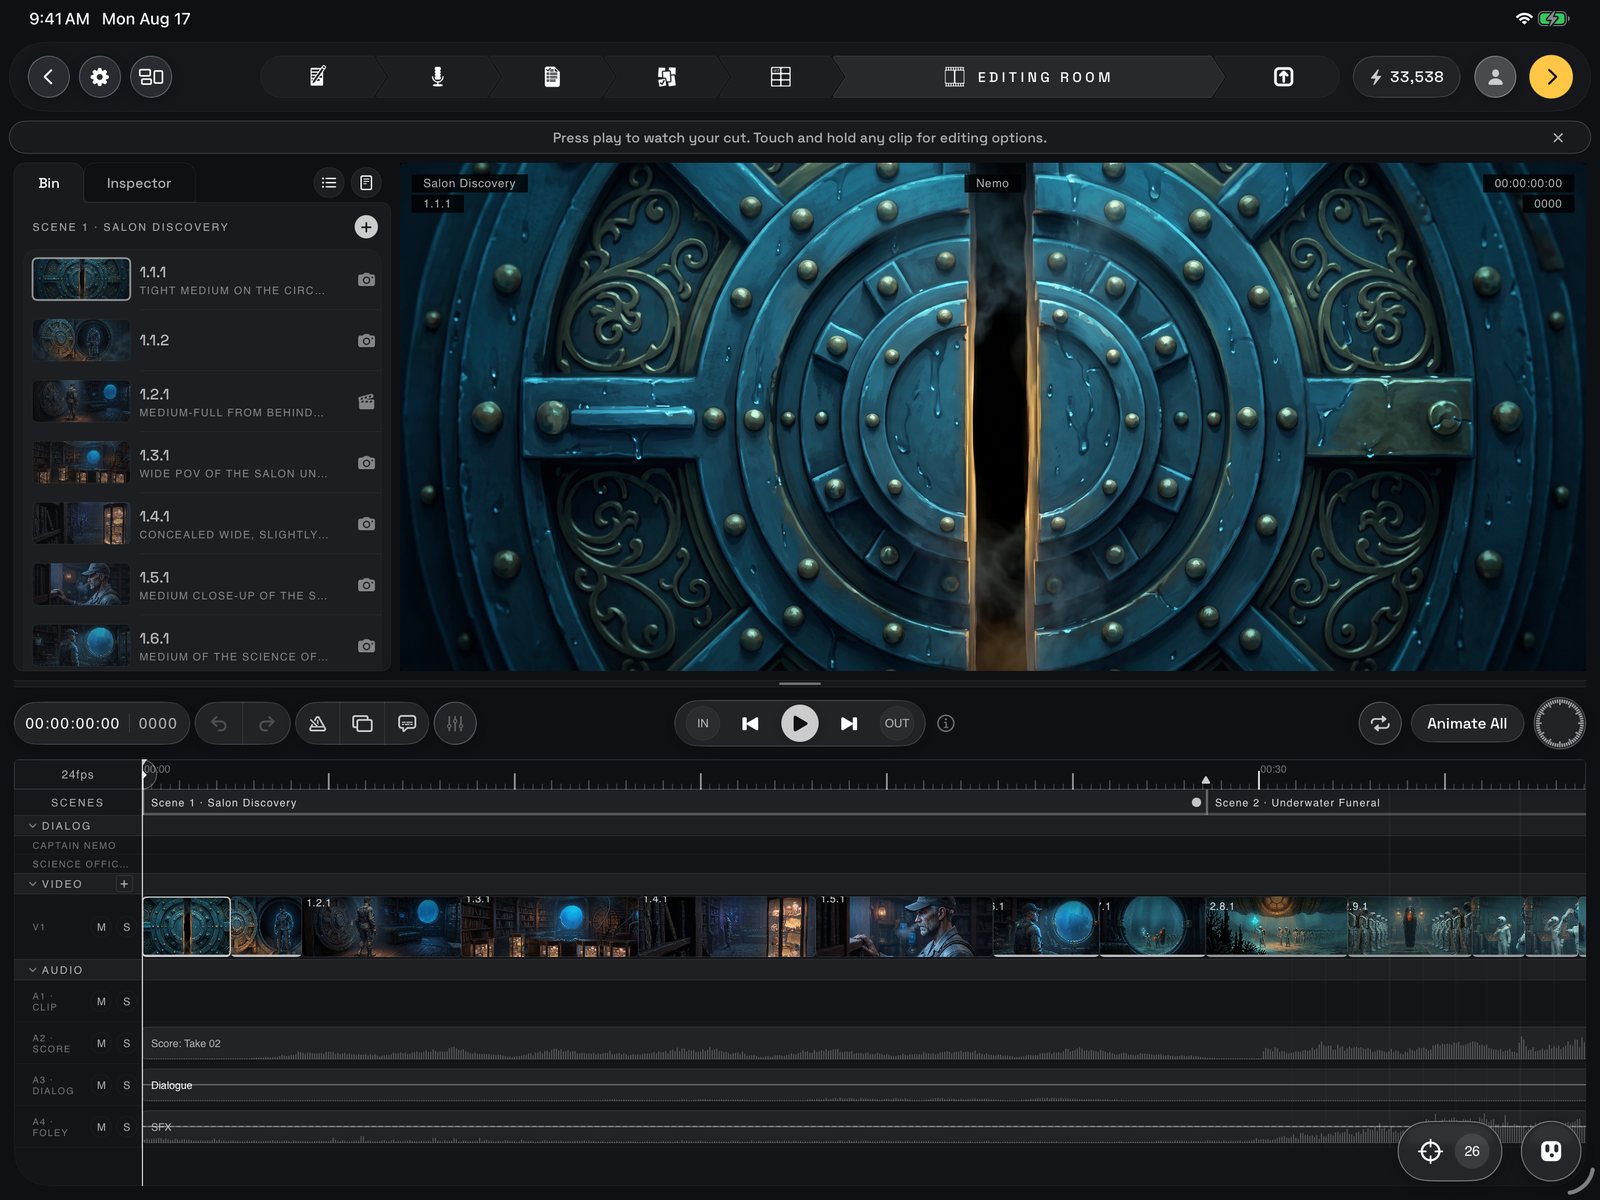
The whole room: Bin and Inspector on the left, the viewer on the right, the transport bar across the middle, the tracks below.
2 · The jog wheel
The wheel is the editor’s dial, and while it is out it is the transport. With nothing selected the inner dial scrubs the playhead; select a clip and it slides it; arm an edge with NEXT or PREV and it trims. The outer ring slips the footage inside a clip or rolls the cut, and with audio armed it rides the level. Its label always names its current job; the razor cuts whatever is under the playhead. The full grammar is in the key.3 · The tracks
The tracks are the timeline itself. Top to bottom: Dialog, one thin row per speaking character with a caption block for every line; Video, your picture layers (V1, then V2 and up); Audio, the sound rows. Each group’s header folds to thin strips, and every clip wears its scene’s colour. Tap a clip to select it: the playhead parks on its first frame and the sidebar jumps to the Inspector. Drag to move it (neighbours shove aside; edges, playhead and marks snap), or slide it up or down to change layer. Drag the trim grips on a selected clip to shorten or lengthen the shot, or tap one to hand that edge to the wheel. Fade handles set a fade’s length and curve. Add a layer for a second picture over the first; each has mute and solo. Dialogue lines live twice: as a caption block up top and a line clip on the Audio Dialog row. Tap to select, drag and it re-homes onto the shot it lands on. The Audio group has a row per kind of sound (A · Clip for the sound inside your video clips, A · Score, A · Dialog, A · Foley for effects and any room sound split off the dialogue, A · Misc for anything you place yourself), each with M and S. Tap a video clip’s own audio strip to arm its sound for the wheel; hold it to mute just that clip. Once dialogue is split, each piece can be tapped, held for its menu, and slid in time.4 · The Bin
The Bin is your project’s media library: shots grouped by scene, then Score, SFX and Dialogue, with badges for what is NEW, ON TL (on the timeline) or HIDDEN; switch list and grid with the view toggle. Tap a shot and the viewer becomes a source monitor for it (a SOURCE badge appears so you never confuse it with the cut); tap a cue, sound or take to audition it the same way. The transport bar swaps for a source bar with Set In, Set Out and a source wheel for frame-precise marks; Add to timeline puts the marked stretch at the playhead, and Done returns you to the cut. Rows also drag straight onto the tracks. New shot + adds a shot to a scene and opens it in the Beat Editor; New audio + asks Ozu for a new cue, spoken line or sound (section 12).5 · The Inspector
The Inspector shows every setting for the selected clip as a stack of cards. Generation is where a still becomes video: resolution, length in seconds, handles (two spare seconds to cut with), the video model and how many versions, then Animate with the price on the button. If a shot comes back flagged by a model’s content filter, the card says so, nothing was charged, and it offers Mature mode or arms a retry with the filter off that you send at the price shown. Position & Transform moves the clip inside the frame (position, scale, rotation) and sets its opacity and blend mode over the layer beneath. Colour grades this clip alone (brightness, contrast, saturation, hue, tint); Global colour grades the whole film on top and adds grain. Every card has a reset (transform, colour, global colour). Select a dialogue line instead and the Inspector becomes the line editor: rewrite the words, save them as a new version, or generate audio to hear the line in the actor’s cast voice for the credits shown.6 · Hold a clip: the radial menu
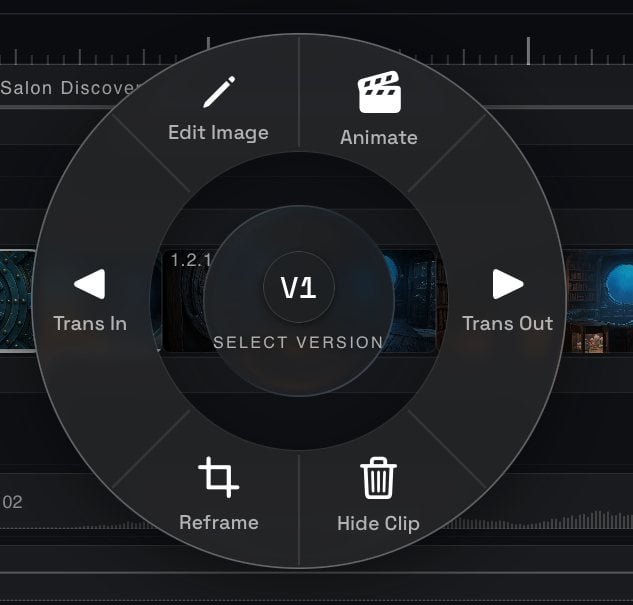
The radial menu on a held clip: Trans In and Trans Out left and right, Edit Image and Animate above, Reframe and Hide Clip below, the version hub in the centre.
7 · Animating a shot
Video is the most expensive thing in Ozu, so it never fires blind. Default opens Ozu’s shot direction: he summarizes the shot’s written direction, takes your notes and rewrites the prompt for the model you chose. Nothing is spent until you tap Animate in that panel. When the shot carries a dialogue line, a short lip-sync reminder appears instead: the voice and the caption are two separate things, and both must sit under this shot for the lips to match. Reference drives the animation from a video instead of words. Upload one, or Record one with the camera: the shot’s dialogue plays so you can perform to it, and recording stops itself at the end. Play any take back, retake, or choose Use this take; a card then asks whether to generate now or place it on the timeline first to trim before spending. A shot with a reference shows it as a small picture in the viewer (tap to swap which is big). 3D Set performs the camera move on a virtual stage (section 10). Once a shot has video, Edit Video and Extend open the take editor: pick the take, write the direction, set the seconds to add when extending, and run it for the price shown. The result is a new take in the version hub.8 · The Beat Editor
Edit Image, New shot + and Edit beat… open the Beat Editor full screen: the still on the left with a filmstrip of every version, and on the right Image and Video tabs. On Image: the model, how many to make, the written direction and a references shelf for the actors, sets and props the picture should match, plus your own sketch or photo and a pen to draw on the frame itself. Generate makes new stills for the price shown; on the Video tab the same button animates, through Ozu’s gate. Pick the still you want and tap the check: it becomes the shot’s picture and you are back on the cut.9 · Reframe
2D is a crop that never touches the original: drag, pinch and twist the picture inside the frame, or use the scale and rotation sliders, then confirm. 3D moves the camera inside the shot: Ozu builds depth from the still (show the depth map to see it), one finger orbits the viewport, and you set the lens and tilt. Generate renders the new angle as a new version of the shot.10 · The 3D virtual set
Choose 3D Set from the reference page and you get a stage to block the shot and perform the camera. On Layout, place actors, props and sets from your storyboard or plain shapes (cube, wall, person and friends) and arrange them in the blueprint, the side view or the perspective view; Properties give every object exact numbers, and the overlay ghosts the shot’s still over the frame so you can match it. Action → takes you to the camera: drive it with the left stick, right stick and boom, or switch to WALK and carry the iPad through the set. Record, pick a take, and it becomes the shot’s reference video. Back saves the set for next time.11 · Continuity check
Because every shot is generated on its own, a cut can break film grammar without any single frame looking wrong. The continuity pill, left of Ozu’s clapboard, opens the check. It lays out contact sheets of the cut and prices two runs: OBSERVE reads the whole cut raw and flags breaks; MAP CHECK checks every shot against the scene’s recorded camera side, eyelines and blocking. The price is on the button, and progress shows in the banner at the top. Then the findings, in cut order, one at a time or as a grid. Each card shows the shot with the shot it should match, the rule that broke, Ozu’s read in plain words and his confidence; ask for a second look at full resolution if you doubt it. Tick the fixes you agree with, add a note of your own, then Keep as is or Queue updates. When a finding is really a missing design, Create prop has Ozu make it as an asset so every future render keeps it. The last card is the wrap-up: Render fixes rewrites every queued shot with your notes and renders the new frames right here, the film updating in place as they land; with Re-check on, Ozu judges each fresh frame again and the price includes that look.12 · Sound in the Editing Room
The Mixing Booth opens over the sidebar while the cut keeps playing: faders for Dialogue, Score, Video sound and the Master. Full write-up: Mixing. Hold a score or dialogue lane and its own small ring appears: Edit in Booth takes that sound to the Recording Booth on its own tab, and Isolate splits a dialogue take into clean voices and a room bed on this iPad for free (or in the cloud for credits). Edit audio… from the Bin opens the audio editor, where you regenerate a sound from its written direction and use a version on the timeline. Ozu’s clapboard opens a chat about the cut; ask for something new for the Bin and he offers music, a spoken line in a character’s cast voice, or a sound effect. One notice at a time shows above the room: if a score, dialogue take or still failed to arrive, the missing-assets notice offers Retry all; a finished continuity run flashes its result until you look; a New Prop banner opens a prop Ozu made for approval. Everything you do to the cut is covered by undo, and nothing here overwrites a version.What happens next
When the cut plays the way you want it, open Mixing to balance dialogue, score, effects and video sound for the last time; what you hear there is what exports. Then Continue to Export takes the finished film to Export as a video, a storyboard deck or project files.This page mirrors the front page of the in-app guide. Inside Ozu, tap ? on the Project Shelf for the guide, or the ⓘ beside any control for that control’s own write-up.