> ## Documentation Index
> Fetch the complete documentation index at: https://docs.ozu.studio/llms.txt
> Use this file to discover all available pages before exploring further.
# Export
> What the Export room does and how its parts fit together.
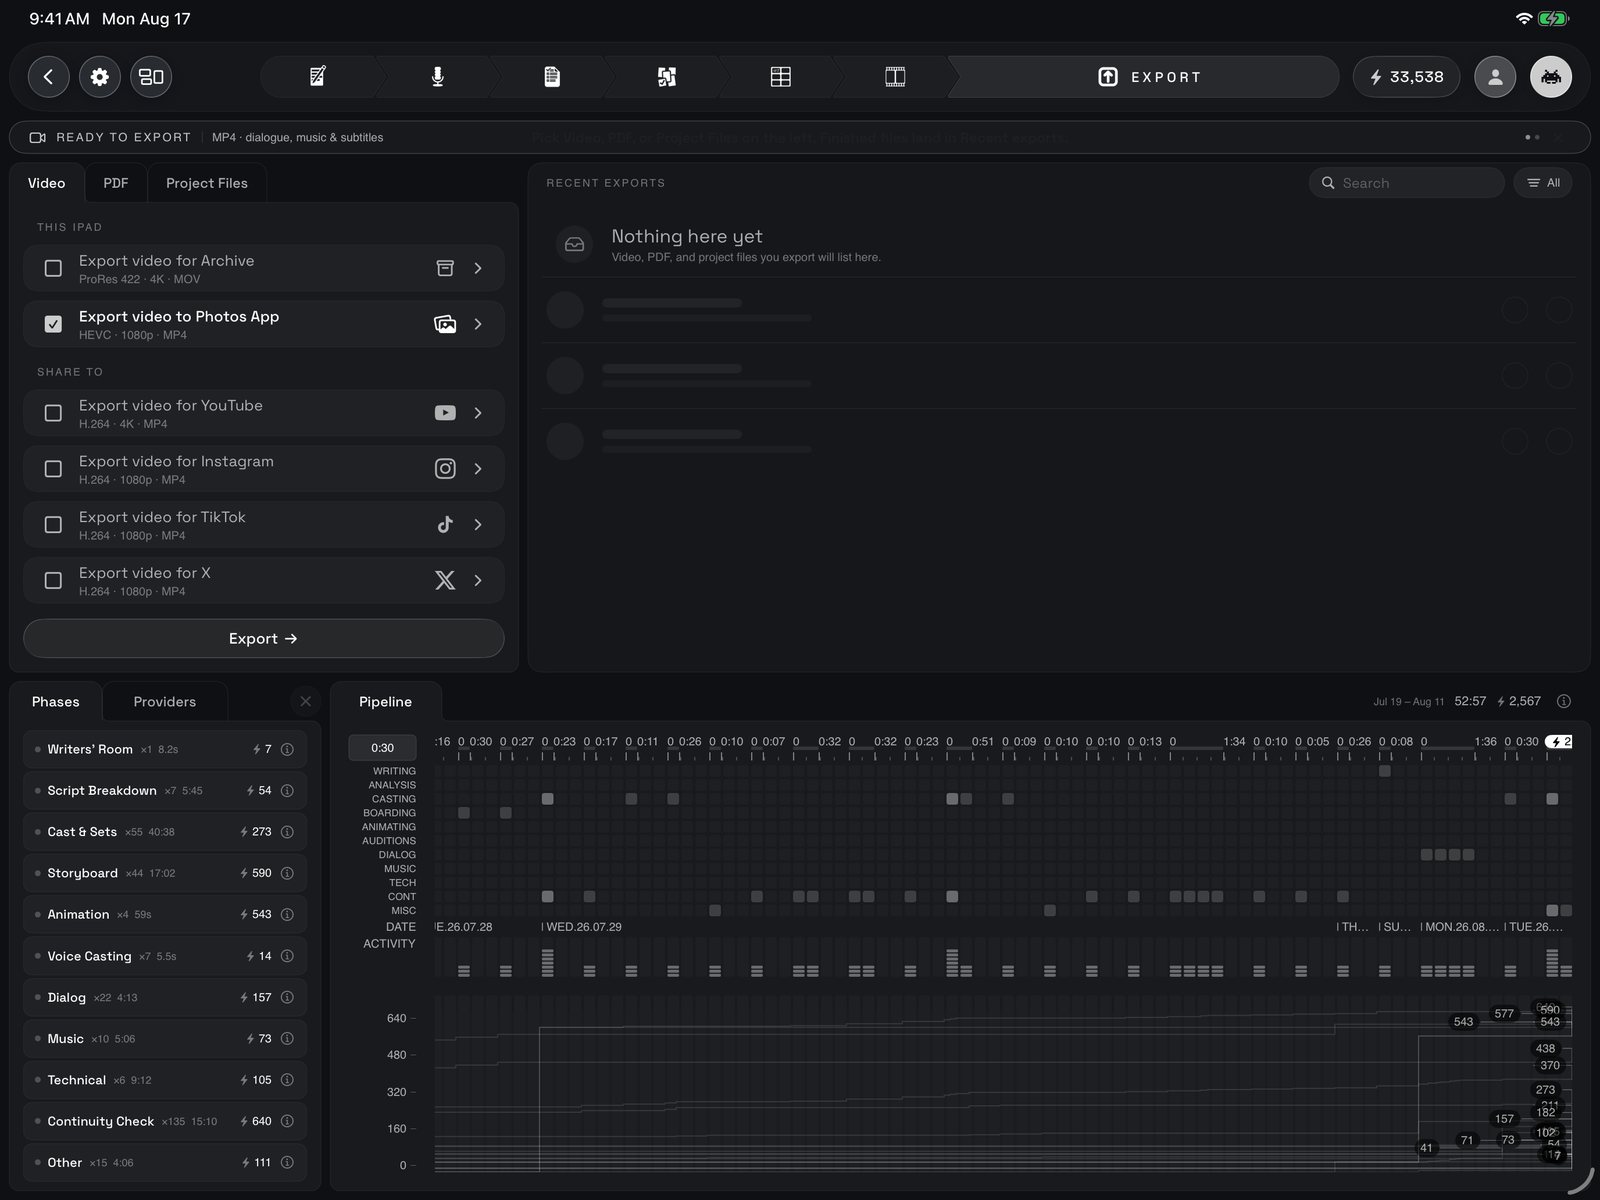
Export is the last room. Your finished film arrives here from the [Editing Room](/guide/editing-room), and this is where you choose the shape it leaves in: a video for a screen or a social feed, a storyboard deck as a PDF, or a project package for another editing app. Pick a tab, set it up, tap Export, and the file lands in Recent exports, ready to watch, share or delete. Below it all, the pipeline chart shows every phase of the film, when it worked and what it spent.
## Three doors out
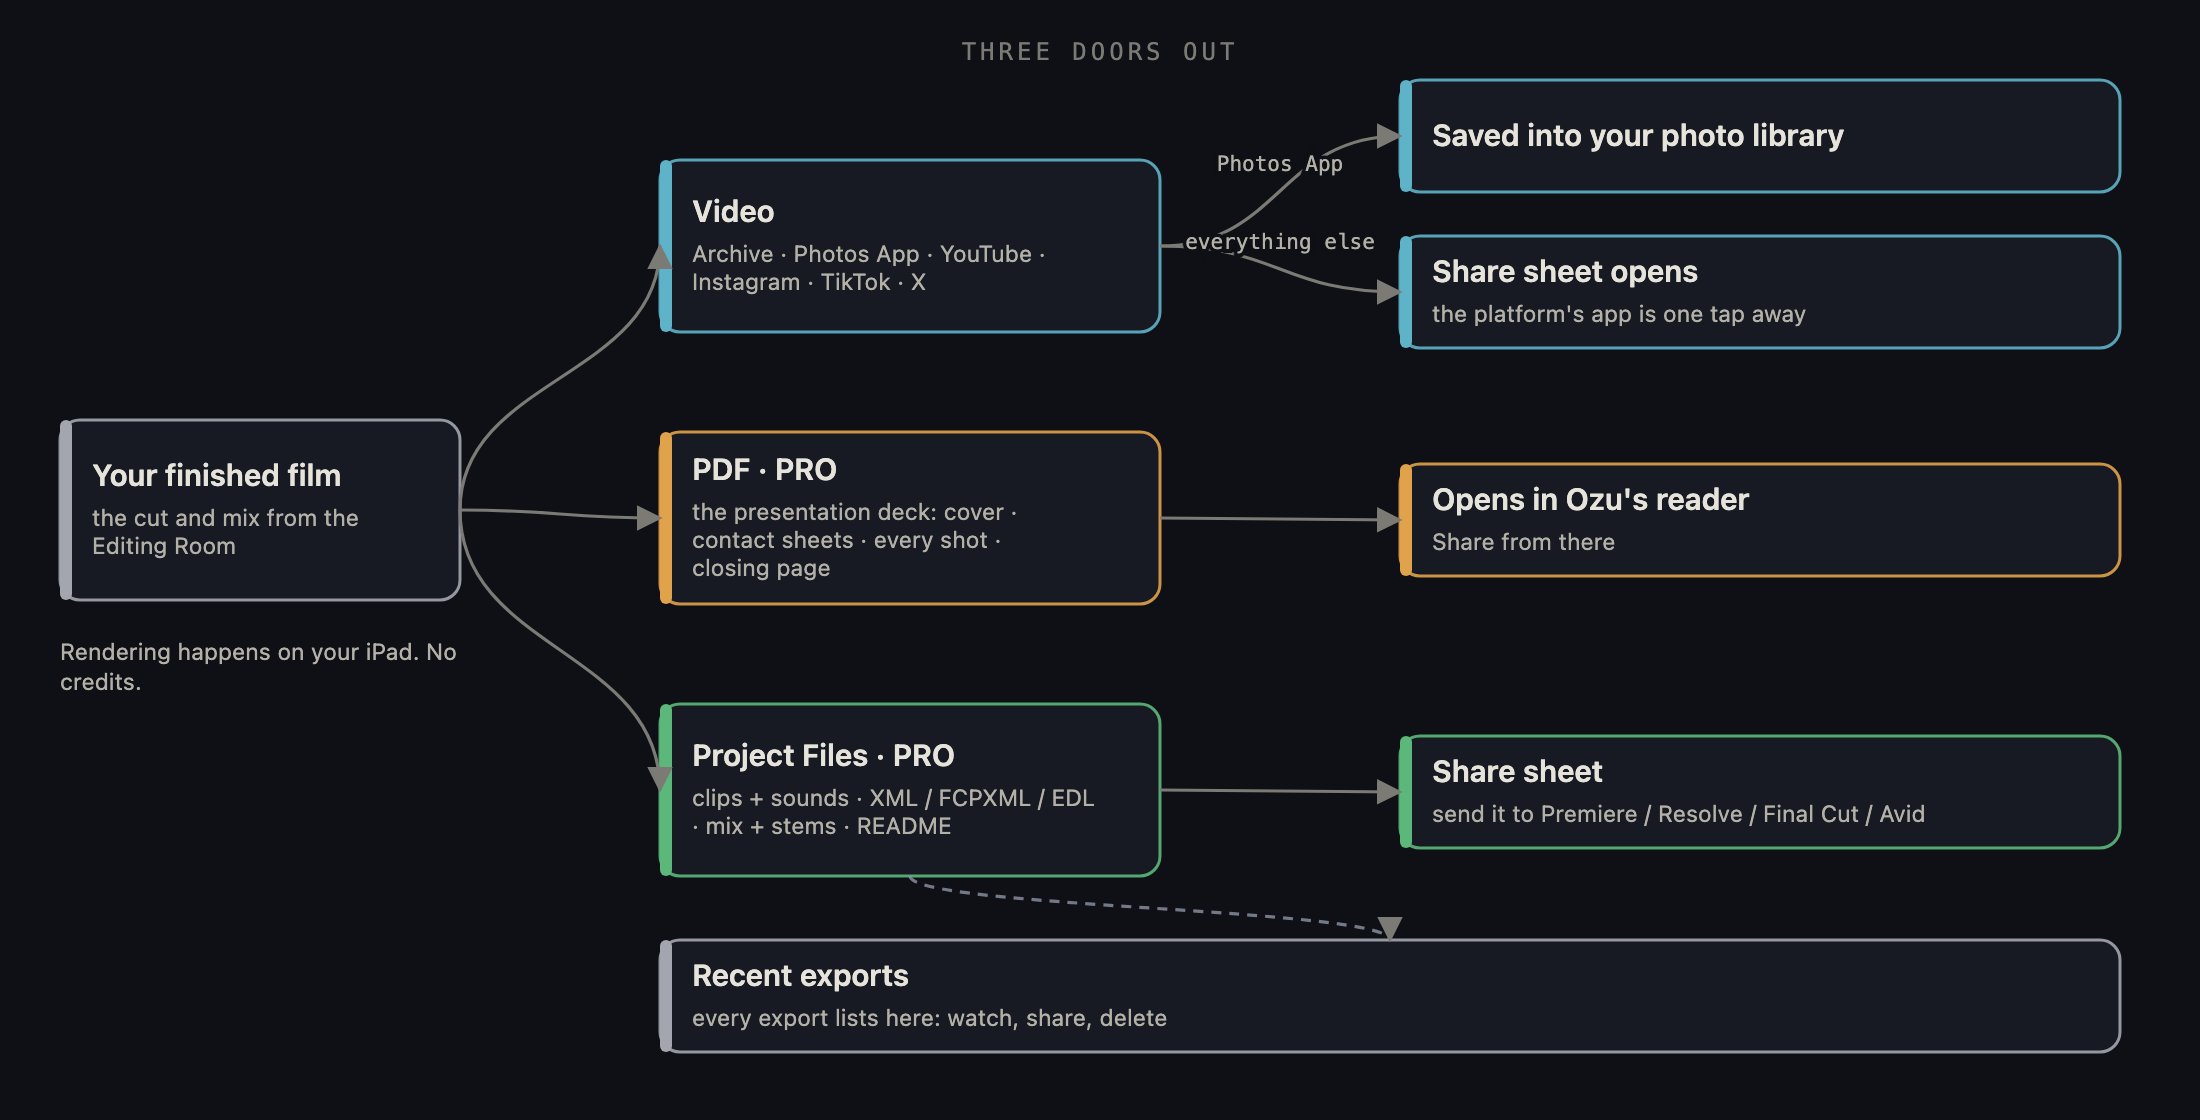 Read it left to right. On the left is your finished film, the cut and [mix](/guide/mixing-booth) from the [Editing Room](/guide/editing-room). In the middle are the three tabs of the format card, one per kind of export, each with its own settings and Export button (Video, PDF, Project Files). On the right is where the file goes the moment it is done: a video into your Photos App or the share sheet for the platform you chose; a deck into Ozu's reader; a package to the share sheet for your editing app. All of them also land in Recent exports, so you never render twice to find a file.
## 1 · Video
Read it left to right. On the left is your finished film, the cut and [mix](/guide/mixing-booth) from the [Editing Room](/guide/editing-room). In the middle are the three tabs of the format card, one per kind of export, each with its own settings and Export button (Video, PDF, Project Files). On the right is where the file goes the moment it is done: a video into your Photos App or the share sheet for the platform you chose; a deck into Ozu's reader; a package to the share sheet for your editing app. All of them also land in Recent exports, so you never render twice to find a file.
## 1 · Video
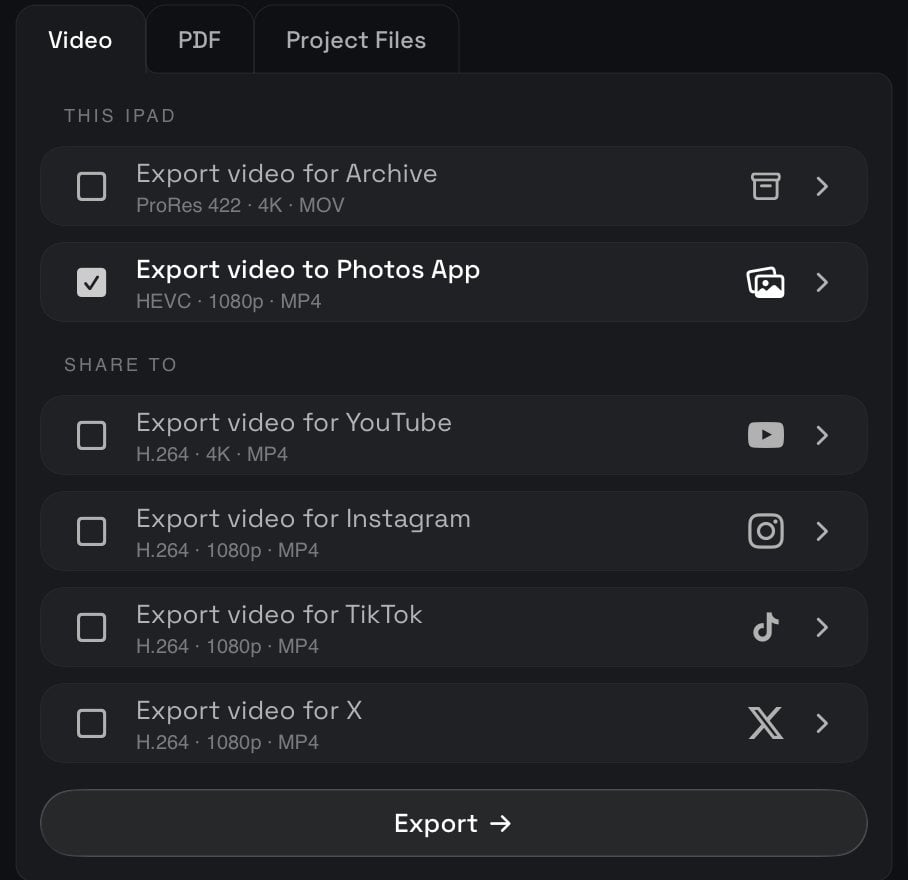
 The format card sits top left. Its three tabs are Video, PDF and Project Files, and it opens on Video. Down the card is a list of destinations in two groups: **This iPad** (Archive, Photos App) and **Share to** (YouTube, Instagram, TikTok, X). Tick a destination and Ozu sets the size, file type and frame rate to suit it; the small line under the name reads out that recipe. Archive is the keep-forever copy at full quality, Photos App saves into your photo library, and each platform gets the file it likes.
To see or change the recipe, tap the row or its chevron: Format, Codec, Size and Frame rate are menus, and changing one makes that destination yours rather than the preset until you pick another. Two switches finish it: Subtitles burns your dialogue into the picture as captions; Overlays (Archive and Photos App only) stamps timecode, scene and shot labels and your watermark on every frame, like a work print. Then Export. Photos App saves the movie straight in and tells you so; every other destination opens the share sheet the moment the render lands, the platform's app one tap away and a caption seeded from your project. On the Free and Basic [plans](/guide/credits-and-providers) the film ends with a short Ozu card. Your usual destination can be set once in Settings.
The format card sits top left. Its three tabs are Video, PDF and Project Files, and it opens on Video. Down the card is a list of destinations in two groups: **This iPad** (Archive, Photos App) and **Share to** (YouTube, Instagram, TikTok, X). Tick a destination and Ozu sets the size, file type and frame rate to suit it; the small line under the name reads out that recipe. Archive is the keep-forever copy at full quality, Photos App saves into your photo library, and each platform gets the file it likes.
To see or change the recipe, tap the row or its chevron: Format, Codec, Size and Frame rate are menus, and changing one makes that destination yours rather than the preset until you pick another. Two switches finish it: Subtitles burns your dialogue into the picture as captions; Overlays (Archive and Photos App only) stamps timecode, scene and shot labels and your watermark on every frame, like a work print. Then Export. Photos App saves the movie straight in and tells you so; every other destination opens the share sheet the moment the render lands, the platform's app one tap away and a caption seeded from your project. On the Free and Basic [plans](/guide/credits-and-providers) the film ends with a short Ozu card. Your usual destination can be set once in Settings.
 ## 2 · PDF, the presentation deck
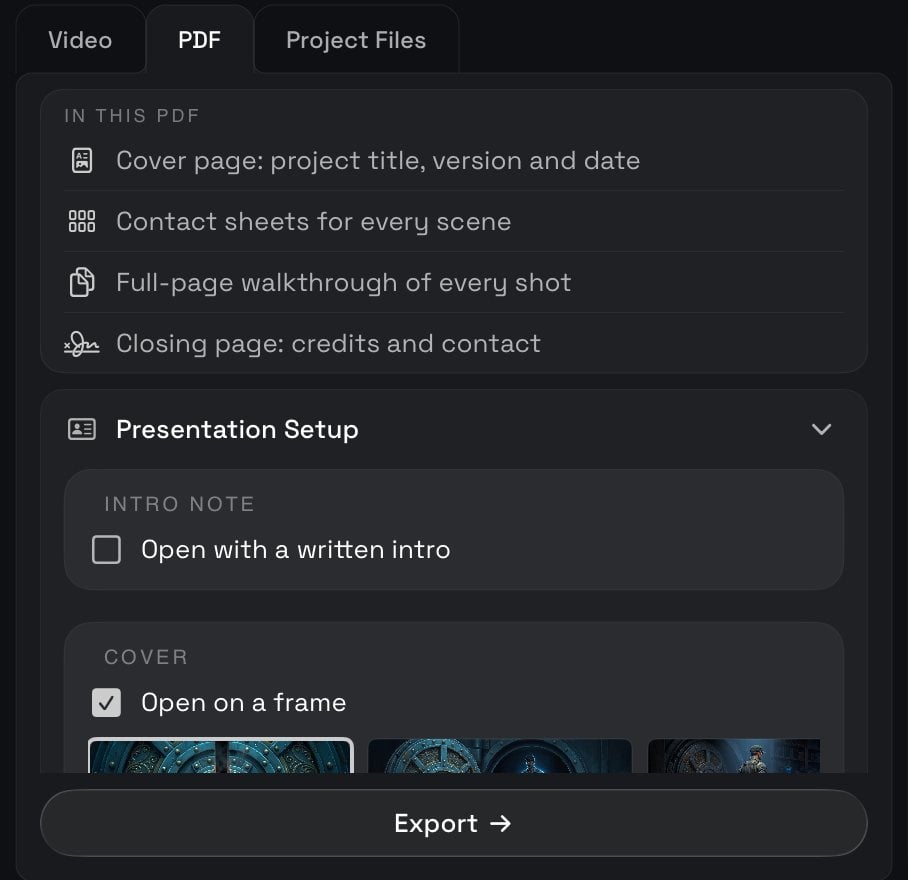
The PDF tab turns your [storyboard](/guide/storyboard) into a deck for a producer or a client. The card lists what goes in: a cover page with the project title, version and date; a contact sheet for every scene; a full-page walkthrough of every shot; and a closing page with credits and contact details. The version number climbs with each export, so a v03 is never confused with a v02.
Presentation Setup opens the drawer where you make the deck yours, top to bottom: an intro note you write, printed as its own page after the cover and signed by your studio. A cover frame instead of plain black, picked from the film in cut order. Your studio name, printed in the © line and as a wordmark on every page, and a logo from your photos that takes the wordmark's place. Creative leads, the names, titles and contact lines on the closing page: add as many as you like, remove one, drag them into order; a blank line stays off the page. And a closing frame behind the Thank You page (the last frame unless you choose another), or plain black like a classic deck.
Everything in the drawer stays on your iPad; none of it goes to Ozu's servers. Save keeps it for this project, and the checkbox above it makes it the starting point for every project after. Then Export builds the deck; tap it in Recent exports to read it.
## 2 · PDF, the presentation deck
The PDF tab turns your [storyboard](/guide/storyboard) into a deck for a producer or a client. The card lists what goes in: a cover page with the project title, version and date; a contact sheet for every scene; a full-page walkthrough of every shot; and a closing page with credits and contact details. The version number climbs with each export, so a v03 is never confused with a v02.
Presentation Setup opens the drawer where you make the deck yours, top to bottom: an intro note you write, printed as its own page after the cover and signed by your studio. A cover frame instead of plain black, picked from the film in cut order. Your studio name, printed in the © line and as a wordmark on every page, and a logo from your photos that takes the wordmark's place. Creative leads, the names, titles and contact lines on the closing page: add as many as you like, remove one, drag them into order; a blank line stays off the page. And a closing frame behind the Thank You page (the last frame unless you choose another), or plain black like a classic deck.
Everything in the drawer stays on your iPad; none of it goes to Ozu's servers. Save keeps it for this project, and the checkbox above it makes it the starting point for every project after. Then Export builds the deck; tap it in Recent exports to read it.
 ## 3 · Project Files
The Project Files tab packs the film for another editing app. The card lists the package: every clip and sound, named in story order; the edit as three timeline files (Premiere/Resolve XML, FCPXML and an EDL) so Premiere, Resolve, Final Cut or Avid opens it with every cut in place; dialogue and score on their own tracks; and a README with the import steps. The finished [mix](/guide/mixing-booth) rides along too, with each of its channels on its own, so your editor starts from the sound you heard here. Export builds it, and since there is nothing to view inside Ozu, tapping the package in Recent exports opens the share sheet so you can send it to your Mac.
## 4 · Export, and while it renders
The deck and the package are [Pro](/guide/credits-and-providers) features. Below Pro, their Export button wears a PRO lock and opens the plans instead; the video export is open to everyone.
Tap Export and the [banner](/guide/everywhere-in-ozu) under the top bar becomes the progress card: what Ozu is doing now ("Composing timeline…", "Encoding… 42%", "Building storyboard…"), a bar and a running clock. Cancel stops the render; nothing is saved, and the film itself is untouched. Rendering happens on your iPad and costs no [credits](/guide/credits-and-providers). If the project has no timeline yet, the card says so and sends you to the [Editing Room](/guide/editing-room) first.
While it renders, the forward puck at the top right is The Waiting Game: the arcade, full screen. If the render lands while you play, the share sheet waits and opens when you quit. Your play time is drawn as its own row on the pipeline chart below.
## 5 · Recent exports
Every export lands in the Recent exports panel, top right, newest first. Each row shows what it is (video, deck or package), the project name, the facts (type, running time or page count, file size, how long ago) and a strip of the film's frames. Tap the row to open it: a video plays full screen, a deck opens in the reader with a Share button, a package goes straight to the share sheet. The glass share button on the row opens the share sheet with the file and a caption ready, to save to Files or send anywhere. Swipe the row left to delete the file from your iPad; you are asked first, whatever you already shared stays put, and the film is untouched. A hold offers the same share and delete. When the list grows, search by name, type or size, or filter to one kind. If the exports folder passes 2 GB Ozu tells you; Settings → Storage is where you clear old ones.
## 6 · The pipeline chart
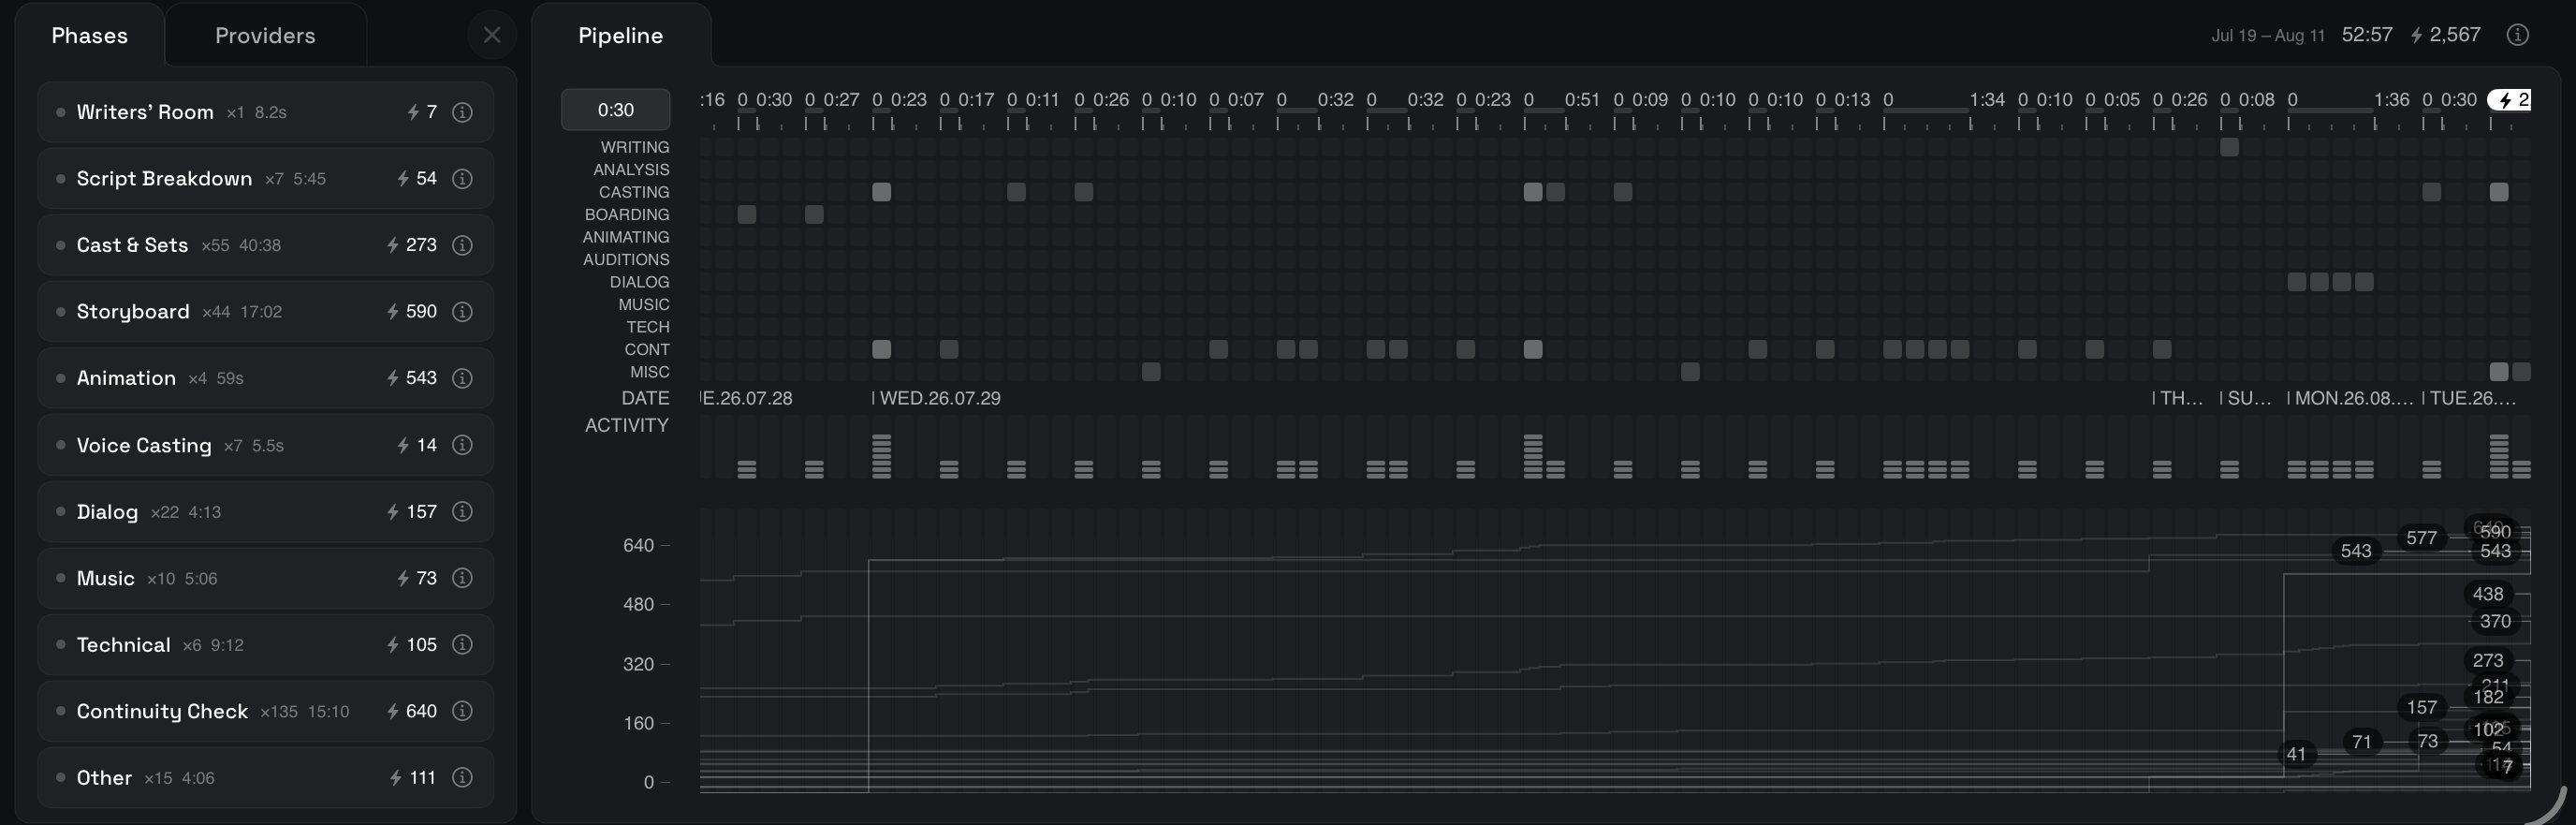
The bottom half of the room is the pipeline chart: the whole production, phase by phase, on one clock, with what it cost underneath.
On the left is a list. Its two tabs switch between the **phases** of your film and the **providers**, the AI services that billed you. Each phase card shows how many times it ran, for how long, and the [credits](/guide/credits-and-providers) it spent; its ⓘ explains what the phase did. In pipeline order: Writers' Room, Script Breakdown, Cast & Sets, Storyboard, Animation, Voice Casting, Dialog, Music, Technical, Continuity Check, Sound Editing, Other and The Waiting Game; only the ones your film used appear. Tap a phase to light its squares and its spend line; tap several and they colour in rank, yellow through orange. A provider card lights the moments that provider billed you. Drag down the list to light a run in one stroke; the ✕ clears them all.
On the right is the chart. Each row is a phase; each square is one slice of working time, lit when that phase was working. The chip at the top left sets how much time a square holds, from ten seconds to five minutes (the Script Breakdown chart shares the setting). Quiet stretches fold into a two-square gap and the ruler restarts after it, so the chart shows working time, not waiting; the header adds that time up beside the date range and the total credits. The DATE row stamps the day each stretch began. ACTIVITY shows how many phases were working at once. Underneath is credit spend on the same clock: every phase and provider as a faint line, the ones you lit in colour, with the scale in credits at the left edge. Drag along the ruler to move the playhead; the white pill on it reads the credits spent up to that moment, and it starts parked at the end, on the film's total. For where the prices come from, see Provider costs; the [shelf](/guide/project-shelf)'s Spend Report shows the same money by kind of spend.
## 3 · Project Files
The Project Files tab packs the film for another editing app. The card lists the package: every clip and sound, named in story order; the edit as three timeline files (Premiere/Resolve XML, FCPXML and an EDL) so Premiere, Resolve, Final Cut or Avid opens it with every cut in place; dialogue and score on their own tracks; and a README with the import steps. The finished [mix](/guide/mixing-booth) rides along too, with each of its channels on its own, so your editor starts from the sound you heard here. Export builds it, and since there is nothing to view inside Ozu, tapping the package in Recent exports opens the share sheet so you can send it to your Mac.
## 4 · Export, and while it renders
The deck and the package are [Pro](/guide/credits-and-providers) features. Below Pro, their Export button wears a PRO lock and opens the plans instead; the video export is open to everyone.
Tap Export and the [banner](/guide/everywhere-in-ozu) under the top bar becomes the progress card: what Ozu is doing now ("Composing timeline…", "Encoding… 42%", "Building storyboard…"), a bar and a running clock. Cancel stops the render; nothing is saved, and the film itself is untouched. Rendering happens on your iPad and costs no [credits](/guide/credits-and-providers). If the project has no timeline yet, the card says so and sends you to the [Editing Room](/guide/editing-room) first.
While it renders, the forward puck at the top right is The Waiting Game: the arcade, full screen. If the render lands while you play, the share sheet waits and opens when you quit. Your play time is drawn as its own row on the pipeline chart below.
## 5 · Recent exports
Every export lands in the Recent exports panel, top right, newest first. Each row shows what it is (video, deck or package), the project name, the facts (type, running time or page count, file size, how long ago) and a strip of the film's frames. Tap the row to open it: a video plays full screen, a deck opens in the reader with a Share button, a package goes straight to the share sheet. The glass share button on the row opens the share sheet with the file and a caption ready, to save to Files or send anywhere. Swipe the row left to delete the file from your iPad; you are asked first, whatever you already shared stays put, and the film is untouched. A hold offers the same share and delete. When the list grows, search by name, type or size, or filter to one kind. If the exports folder passes 2 GB Ozu tells you; Settings → Storage is where you clear old ones.
## 6 · The pipeline chart
The bottom half of the room is the pipeline chart: the whole production, phase by phase, on one clock, with what it cost underneath.
On the left is a list. Its two tabs switch between the **phases** of your film and the **providers**, the AI services that billed you. Each phase card shows how many times it ran, for how long, and the [credits](/guide/credits-and-providers) it spent; its ⓘ explains what the phase did. In pipeline order: Writers' Room, Script Breakdown, Cast & Sets, Storyboard, Animation, Voice Casting, Dialog, Music, Technical, Continuity Check, Sound Editing, Other and The Waiting Game; only the ones your film used appear. Tap a phase to light its squares and its spend line; tap several and they colour in rank, yellow through orange. A provider card lights the moments that provider billed you. Drag down the list to light a run in one stroke; the ✕ clears them all.
On the right is the chart. Each row is a phase; each square is one slice of working time, lit when that phase was working. The chip at the top left sets how much time a square holds, from ten seconds to five minutes (the Script Breakdown chart shares the setting). Quiet stretches fold into a two-square gap and the ruler restarts after it, so the chart shows working time, not waiting; the header adds that time up beside the date range and the total credits. The DATE row stamps the day each stretch began. ACTIVITY shows how many phases were working at once. Underneath is credit spend on the same clock: every phase and provider as a faint line, the ones you lit in colour, with the scale in credits at the left edge. Drag along the ruler to move the playhead; the white pill on it reads the credits spent up to that moment, and it starts parked at the end, on the film's total. For where the prices come from, see Provider costs; the [shelf](/guide/project-shelf)'s Spend Report shows the same money by kind of spend.
 ## What happens next
Nothing has to. This is the end of the pipeline: the file is on your iPad, in your Photos App, on the platform you chose or in your editor's hands. When you want changes, the film is still all here: step back into the [Editing Room](/guide/editing-room) to recut or the [Mixing Booth](/guide/mixing-booth) to rebalance the sound, then come back and export again; the new file joins the old ones in Recent exports. And the [Project Shelf](/guide/project-shelf) is where this film sits beside your others, ready for the next one.
This page mirrors the front page of the in-app guide. Inside Ozu, tap **?** on the Project Shelf for the guide, or the ⓘ beside any control for that control's own write-up.
## What happens next
Nothing has to. This is the end of the pipeline: the file is on your iPad, in your Photos App, on the platform you chose or in your editor's hands. When you want changes, the film is still all here: step back into the [Editing Room](/guide/editing-room) to recut or the [Mixing Booth](/guide/mixing-booth) to rebalance the sound, then come back and export again; the new file joins the old ones in Recent exports. And the [Project Shelf](/guide/project-shelf) is where this film sits beside your others, ready for the next one.
This page mirrors the front page of the in-app guide. Inside Ozu, tap **?** on the Project Shelf for the guide, or the ⓘ beside any control for that control's own write-up.